 Indonesian
  Malay
Malay  Vietnamese
  Slovenian
  Slovak
  Latvian
  Bosnian
  Icelandic
  Ukrainian
  Georgian
  Serbian
  Croatian
  Belarusian
  Romanian
  Estonian
  Hungarian
  Czech
Czech  Catalan
  Norwegian
  Lithuanian
  Albanian
  Hindi
Hindi  Italian
  Finnish
  Arabic
  Danish
  Bulgarian
  Thai
Thai  Polish
  Swedish
  Greek
Greek  Portuguese
  Dutch
Dutch  Turkish
  Russian
  Deutsch
  French
  Korean
  Japanese
  English
 Products
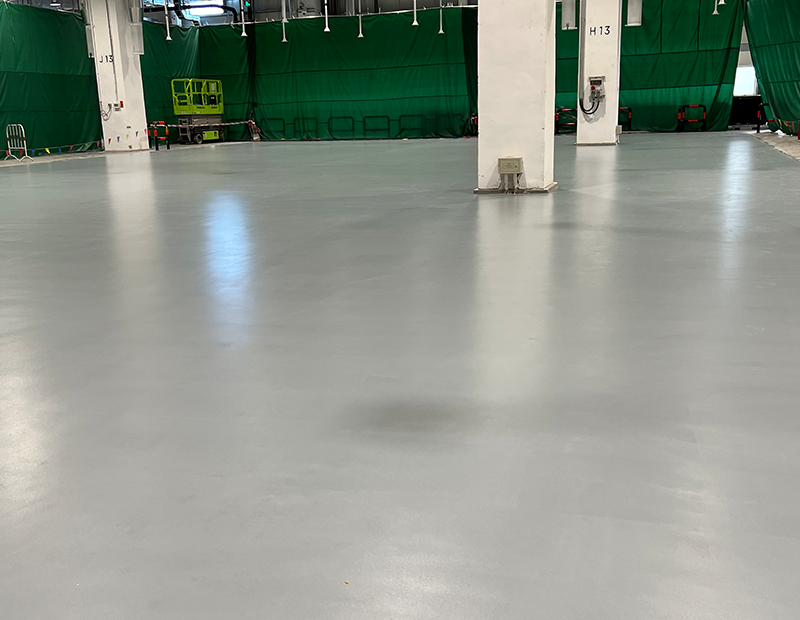
Inorganic grinding stone system
Product Details
Product features
Colorful and exquisite in pattern;
Smooth and seamless, with a dense surface, it is easy to clean, maintain and preserve
Durable, bright and wear-resistant;
Stain-resistant and resistant to chemical corrosion;
The final hardness is good and the strength is high.
Scope of application
It is suitable for ground decoration of commercial buildings such as airports, railway stations, exhibition centers, museums and stadiums, as well as public places such as shopping centers, hotels, restaurants, schools, libraries, hospitals and office buildings.
| Technical Indicators | |||
| Performance Category | Performance Parameter | Technical Index (GB/T22374-2018) | Test Result |
| Drying Time | Initial Setting Time, h | ≥2 | Compliant |
| Actual Dry, h | ≤48 | Compliant | |
| Bleeding Rate | % | 0.00 | Compliant |
| Abrasion Resistance | mm³ | ≤400 | 276.00 |
| Impact Resistance | Heavy Load | No cracking or detachment from base | Compliant |
| Tensile Bond Strength | MPa | ≥1.5 | 2.80 |
| 28d Compressive Strength | MPa | ≥50.0 | 55.60 |
| 28d Flexural Strength | MPa | ≥12.0 | 13.30 |
| Matching Instructions | |||||
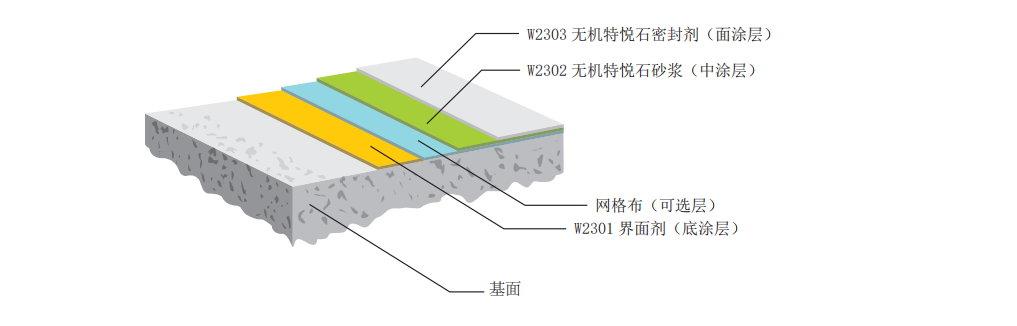
| Coating Layer | Material Model | Packaging Specification | Mixing Ratio | Single Coat Usage (kg/m²) | Single Coat Thickness (mm) |
| Primer Layer | TZ0-W2301 Interface Agent | 20KG | / | 0.05–0.06 | 0.01–0.02 |
| Fiberglass Mesh Cloth (Optional) | TZ0-W2301 Interface Agent | 20KG | / | 0.05–0.06 | 0.01–0.02 |
| Inorganic Bright Stone Mortar (Filling Slurry) | TZ0-W2302 Inorganic Bright Stone Mortar | 25KG | / | 20–22 | 14–15 |
| Varnish Layer (Glossy) | TZ0-W2303 Inorganic Bright Stone Sealer | 18KG/3KG | 6:01 | 0.06 | 0.03 |
| Varnish Layer (Matte) | WEDO-0704S Waterborne Polyurethane Clear Matte Varnish | 16KG/4KG/4KG | 4:01:01 | 0.1 | 0.06 |
| Construction Process | ||
| Process Name | Specific Methods and Requirements | Single Coat Usage (kg/m²) |
| Substrate Treatment | 1. Substrate strength: Compressive strength of the leveling layer ≥20MPa | / |
| 2. Substrate dryness: Moisture content of substrate surface < 8% | ||
| 3. Repair hollowing and cracks on the ground in advance | ||
| 4. Flatness: Gap ≤3mm (measured with a 2m ruler) | ||
| Primer Layer | 1. Use TZ0-W2301: Mix interface agent and water in proportion until uniform | 0.05–0.06 |
| 2. Apply evenly by roller coating or knife coating | ||
| 3. Use a wool brush for edges (door sides, wall corners, machine corners) | ||
| 4. Touch up local missing or whitening areas | ||
| Fiberglass Mesh Cloth Application (Optional) | 1. Lay the mesh cloth neatly and flatly on the substrate | 0.05–0.06 |
| 2. Scrape the cloth with a trowel to ensure full adhesion to the substrate | ||
| 3. Fully cover the mesh cloth with primer (overlap 10cm) | ||
| 4. Use TZ0-W2301: Mix interface agent and water in proportion, then scrape evenly onto the mesh cloth | ||
| Layout Setting | 1. Mark layout lines with a color pen according to the drawing; recheck to avoid distortion | / |
| 2. Note reference points for accuracy; mark lines with a pen | ||
| 3. Take more points for curves; connect points with a soft strip/PVC pipe, draw curves on one side of the pipe, and install dividers per layout | ||
| Divider Strip Paving | 1. Select divider strip type | / |
| 2. Fix strips on the ground per layout; ensure firm installation, accurate position, and smooth/flat lines | ||
| 3. Check flatness with a level in dense strip areas | ||
| 4. Fix curve ends with two nails | ||
| Mid-Coat Layer | 1. Use TZ0-W2302 Inorganic Bright Stone Mortar: Mix mortar and water in proportion (water dosage: 12%–14% of mortar; max 15% to avoid cracking risk). Stir for 2–3 minutes with a forced mixer, then add aggregate (Mortar:Aggregate = 1: 0.6; 25kg mortar + 15kg aggregate) and stir evenly with a forced mixer | 20–22 |
| 2. Pave evenly in divider strips (start with edges/corners) | ||
| 3. Check flatness with a ruler; touch up gaps promptly | ||
| 4. Allow full curing before paving other colors | ||
| 5. Use a bubble-removing roller to eliminate bubbles after paving | ||
| 6. Reserve repair materials during paving | ||
| Rough Grinding | 1. Grind the floor with 50# diamond discs and clean dust | / |
| 2. Grind with 50# resin discs | ||
| 3. Check flatness with a ruler while grinding edges | ||
| Medium Grinding | 1. Grind with 150# resin discs | / |
| 2. Wash and dry the floor after grinding | ||
| Filling Slurry 1 | 1. Clean the floor with a vacuum to ensure it’s clean and dry | 0.4–0.5 |
| 2. Mix interface agent:Water = 1:10, then spray evenly on the floor | ||
| 3. Spread 150# bright stone sand evenly on the surface | ||
| 4. Polish with a floor scrubber (150# resin disc); ideal state is slurry-like material. Add interface agent-water mixture and sand as needed to seal pores | ||
| Fine Grinding 1 | 1. Grind with 300# resin discs | / |
| 2. Wash and dry the floor after grinding | ||
| 3. Grind edges with a hand grinder | ||
| Filling Slurry 2 | 1. Cover patterns/zones with paper tape for protection before filling | 0.4–0.5 |
| 2. Mix interface agent:Water = 1:10, then spray evenly on the floor | ||
| 3. Spread 150# bright stone sand evenly on the surface | ||
| 4. Polish with a floor scrubber (150# resin disc); ideal state is slurry-like material. Add interface agent-water mixture and sand as needed to seal pores | ||
| Fine Grinding 2 | 1. Grind with 300# resin discs | / |
| 2. Wash and dry the floor after grinding | ||
| 3. Grind edges with a hand grinder | ||
| Precision Grinding | 1. Grind with 500# and 1000# resin discs | / |
| 2. Wash and dry the floor after grinding | ||
| 3. Polish edges with a hand grinder | ||
| Sealing Layer | 1. Apply sealer evenly with no accumulation | 0.06 |
Construction section
Notes
Pay attention to different treatment methods for various gaps, hollows, oil stains and dampness, etc.
The grid cloth must fully cover the base layer (overlapping by 10cm), without any wrinkles or bulges.
The divider strips should be installed firmly, accurately positioned, and with straight lines. Check the flatness with a level.
The ratio of mortar, water and aggregates must be accurate. Aggregates that are damp or discolored are not allowed to be used.
Stir the materials according to the spreading speed. The materials must be thoroughly mixed. When spreading by color separation, wait until the previous layer of materials is completely cured.
When laying the material, use a straightedge to check the flatness. If there are any concave parts, replenish the material in time.
If it is found that the materials are insufficient during the laying process, stop immediately. Install the divider strips and wait for the second batch of materials to arrive before laying again. When laying the material, reserve the grouting material
Technical Statement
Our company can design construction plans of different specifications (thickness, effect, etc.) through flexible matching and combination of various products to meet the personalized requirements of all kinds of customers. To ensure that your project can select the appropriate floor system, please consult our professional technical advisors. However, when using our company's products, please strictly follow the construction process, dosage requirements and precautions of the product. Otherwise, our company will not bear any responsibility for the quality of the project or any losses.
Construction conditions
The moisture content of the substrate surface is less than 8%
Relative humidity ≤ 80%
Dew point temperature: The substrate and the substrate of the uncured coating must be at least 3℃ higher than the dew point temperature to reduce the risk of condensation or mottling of the ground coating
For specific details, please refer to the construction plan.